Photobucket Design Teams Tutorials

Wednesday, November 21, 2012

the color room :) :) :)


Hello Hello :)

I thought I would share with you the Anatomy of a Page post from The Colour Room that I did for my Palette #135 layout :) :) :)


Materials List;

12 x 12 grey board – Imaginarium Designs
Chipboard hearts – Imaginarium Designs
Glimmer Glam [Royal Velvet] - Tattered Angels
Chalkboard Glimmer Mist ]Monolith[ - Tattered Angels
Paper Pen [Magenta] Viva Decor
12 x 12 Template [Flying Geese] – The Crafters Workshop
6 x 6 Template [Mini 4 Flowers] by Julie Fei-Fan Balzer for The Crafters Workshop
Impasto – Mont Marte
Gesso – Krylon
Cotton thread


 Snapshot 1
  • ·      Background prepared with using spray gesso to achieve 2 tone effect.
  • ·      Dimensional geese created using template and impasto, it is applied with a palette knife.


Snapshot 2
  • ·      Photo edged using black ink to define it against the white background.
  • ·      Chipboard heart coloured using the Royal Velvet Glimmer Glam.
  • ·      Extra splats of colour [royal velvet glimmer glam and monolith chalkboard glimmer mist]    applied using a small-medium sized paint brush.


 Snapshot 3
  • ·      Floral pattern created using mini flower template and impasto, applied with a palette knife.
  • ·      Chipboard heart coloured using the Royal Velvet Glimmer Glam.
  • ·      Extra splats of colour [royal velvet glimmer glam and monolith chalkboard glimmer mist] applied using a small-medium sized paint brush.
  • ·      Pink dots created using Viva Décor paper pen.
  • ·      Cotton thread added to create interesting visual interest. Adhered under chipboard elements using quick clear drying glue.
  • ·      Organic elements [dried flowers] added to coordinate with and tie in the photo content.
Cheers and I hope you are haven a great weekend :)

Imaginarium Designs :) :) :)


Hello Hello :)

I am sharing with you today the post I did for Imaginarium Designs :) :)


I did a guide on how I created a certain background look, I do hope you enjoy :)

I created this layout background [below] using the awesome new Imaginarium Designs chipboard Butterfly and a 12 x 12 grey board background.


To begin with I have some of my favourite products [other than Imaginarium Designs];

Tattered Angels Chalkboard Glimmer Mist - Teal High Heel

Viva Decor Croco Crackling - White

Krylon Gesso Spray


To begin I first adhere the Imaginarium Designs Chipboard Butterfly to my background using fast clear drying gel glue.

Then using a spatula I apply the crackling medium roughly and randomly over and around the butterfly, and allow it to dry and crackle.


When it is dry and all crackled I apply a light coat of spray gesso.

When the gesso is dry I then apply a liberal coating of Chalkboard mist over the background; applying a more concentrated area of mist over the butterfly.

This is then allowed to dry. Whilst I do use the heat gun to dry the mist I don't recommended it as the fumes from the gesso are toxic.


Here is a close up of the wonderful effect that can be achieved :)

Well I do hope you enjoyed this mini guide to how I create some of my layout backgrounds.

Cheers and Happy Creating

Louise :) xox

Friday, August 24, 2012

Aussie Scrap Source Layout :) :) :)


This week at Aussie Scrap Source we’re looking at ways of incorporating shapes into your mixed media projects and scrapbook layouts – from diecuts and punched shapes to epoxy and Art Parts. 
Check out the inspiration provided by the fabulous design team, [Ive included mine below] and then, send images of your own projects inspired by repetitive or scene-building shapes.   

Shapes_epiphany_LNelson (2)

Materials used;

12 x 12 Grey board
Gesso - Mont Marte
Florists vine
Staples
Tattered Angels Chalkboard Glimmermist - Chalk and Grape Ape
The Crafters Workshop 12 x 12 Circle Explosion template
Epiphany Epoxy Round buttons
Prima Flower/vine and Alphas


Shapes_epiphany_LNelson
For the shapes mixed media challenge brief I got to create with the versatile Epiphany range of products; and it is these she has taken her direct inspiration from. I chose to use one of the range of self adhesive buttons. The round buttons coordinated perfectly with one of my favourite Crafters Workshop templates.
Shapes_epiphany_LNelson_ step-pic1
I took direct inspiration from the shape of these Epiphany buttons and used the circle design to inspire through the whole creative process of my layout.
Shapes_epiphany_LNelson_step-pic2
Using watered down gesso in a mist bottle I first sprayed a combination of funky circle patterns on to my background., and allowed to dry.
Shapes_epiphany_LNelson_step-pic3
Then using The Crafters Workshop circle explosion template and Tattered Angels chalk Chalkboard glimmer mist, I created an 'explosion' of circles over the top of the funky gesso circle pattern.
Shapes_epiphany_LNelson_step-pic4
Before final embellishing this is what the background looked like. After I have attached the photo and embellishments, I shielded my photo with some scrap paper and added some extra splats of colour with the purple chalkboard mist, just using the bottom of the applicator spray nozzle and flicking it on.

I sewed the buttons on using some of the florists vine :).

Shapes_epiphany_LNelson (1)
This is how the background looked after drying. It is just the perfect complement to the Epiphany button embellishments.
Well thats it from me for the mo I do hope you have a fabulous weekend :)
Lou xox

Sunday, August 19, 2012

Anatomy of a Page :) :) :)


Hello Hello :)

Back again :) I thought I would start doing a little bit of a layout highlight as I have this fabulous online friend who is always asking me to share and or do videos/online classes etc, but Im terribly time poor as a full time shift worker. So my friend Faygie, these are in honour of you and your amazing and generous friendship/feedback :) Oh and I stole the idea from Somerset Memories Magazine :) :) :)


Background

I have used 12 x 12 1.2mm grey board from Imaginarium Designs. I masked of half of the background just with a piece of paper and then using a misting bottle with watered down gesso sprayed along the edge of the paper [to get a sort of straight line lol] and allowed the gesso to run down the board to the bottom edge, and then dryer with a heat gun.

The top half I sprayed with Chalk Chalkboard Glimmermist from Tattered Angels.

Embossed Circles behind photo

I have used Stampendous - aged ivory to adhere it I just sprayed a circle pattern of the watered down gesso, dabbed it with a paper towel but not to much so that it was still damp and then sprinkled on the embossing powder. Shoo off the excess and then heat set with the heat gun.

Embellishing

I have just randomly twirled up some florists vine and attached using staples and a long arm stapler. and then artfully [LOL :P] adhered the feathers in amongst the vine with clear drying gel glue. The Prima leaves and nest were also adhered using the same glue.

The extra little splats of black are watered down Indian ink and I put them on last. I shield my photo and nest with scrap card and then applied the splats with a soft bristle paint bush :)

Well I think thats about it :) there really isn't too much that goes into my layouts LOL :)

Cheers and I hope your having a creative week :)

Lou xox

Friday, July 27, 2012

Jenni Bowlin Studio Custom Embellishments Video :) :) :)

Jenni Bowlin Studio Gazette/July Kit Layout Step Technique :) :) :)


Hello Hello :)

I had fun creating 2 quick and easy step out's using the Jenni Bowlin Studio July kits. the first one is featured in the July Gazette >>>>> Click HERE :)

The second one below :) :) :)


For my layout, ‘Snap’ I have used just a few simple paint dribbles to accentuate the photo and draw the viewers eye straight to the photo.

I have used Fountain pen paint, with a little water added. I have mixed it up in a little pot to make it easier to draw up in a small syringe that I used for the dribbles.


To start with I used a small soft bristle paint brush, loaded with paint and applied some splats of black to the layout background on and around the area I plan to place my photo.


Then using a small syringe I drew up a full syringe of paint. To get the dribbles I applied the paint by gently squeezing out the paint whilst the page was tilted, this allowed the paint to run down the page creating wonderful dribbles.


Here is my completed layout. I love how the black dribbles help to draw the eye straight to the photo.


Cheers and I do hope you enjoyed both of these step out's.

Lou :) xox

Monday, May 21, 2012

Jenni Bowlin Studio Layout Backgound Technique video :) :) :)

Hi Guys

Ive had the pleasure of creating another technique video for the amazing Jenni Bowlin Studio!!!


Cheers and I do hope you enjoy :) :) :)

Tuesday, April 17, 2012

Jenni Bowlin Studio Mercantile Splatty Background and Mottled Buttons :) :) :)

Hello Hello Guys :)

I wanted to share with you my creative fun creating a technique video for the Amazing Jenni Bowling Studio Mercantile :) I was honoured to guest for JBS for April [see post here] and I was also asked if I would like to create a video using the wonderful JBS paints?/....UM YES!!!!!! LOL :) :) :)

The layout I created is below and at the bottom of the post is a web link to the Video :) :) :)

I do hope you enjoy :)


Vidoe can be viewed;

Here :) :) :)

And

HERE  :) :) :) 

Please don't hesitate if you have any questions :) :) :)

Saturday, March 3, 2012

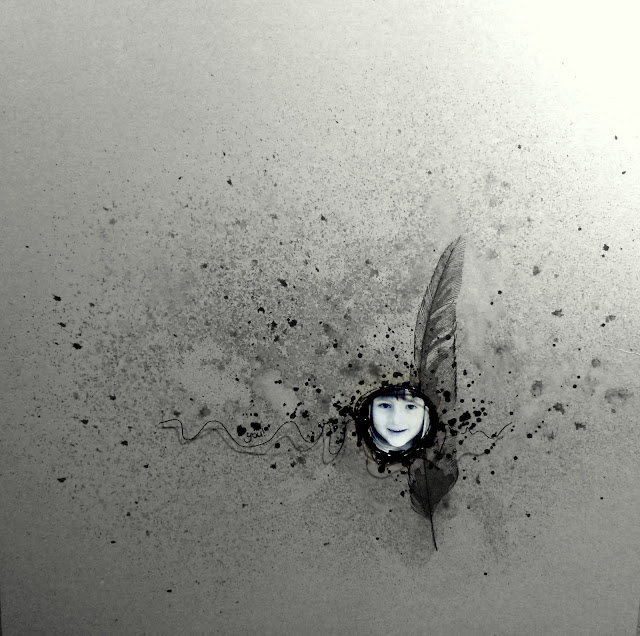
Aussie Scrap Source Feathers Trend layout creative background step by step

Hi Guys

For this post I have done a bit of a mini step by step to show you how I created the background for this layout featured in the Aussie Scrap Source Feathers Trend post :) :) :)

I apologise that the pics are a bit yellow and grainy as I took the photos at night with not the best overhead lighting.


This is the layout [pic taken in better lighting and colour corrected :)]

Products used;

12 x 12 Chipboard background
Tattered Angels Glimmer Mist - Cinder
Hero Arts Stamp
Black ink pad
Black 26 gauge craft wire
Black Signo gel pen

Extra kit tools;

Small soft bristle paint brush
Mister bottle with water
Clear acrylic stamping block
Heat gun
Absorbent paper towel


After stamping the image heat set it with the heat gun


Using a small paint brush paint the feather with glimmer mist and then dry with heat gun


Using the water mist bottle spray the layout background and stamped/painted image


Whilst the layout is still wet with water add splats of glimmer mist with the paint brush, by gently taping it 


 Gently dab some of the pooled water and mist with a paper towel and then apply a light spray of glimmer mist


Dry with the heat gun, and using a paper towel dabbing gently at the larger areas of pooled water and mist to absorb some of the moisture but not all, and then dry of with the heat gun


Add extra splats of glimmer mist with the paint brush to complete the 'design balance' and visual effects desired, [here I have already attached my photo, so I have protected it with a scrap of paper whilst adding extra splats of mist]

Below are some close ups of the completed layout [in better lighting and colour corrected :)]


Well that is quite simply IT! LOL :)

Cheers and Happy Scrapping

Louise :) xox

Oooh and PS, please please, if you do have a go at this technique I would love it if you would post a link to your creation so that I can enjoy your creative fun and fabness 2!!!!!!

Aussie Scrap Source quick & easy stamp making step by step


Hi Guys

This is a project I completed for Aussie Scrap Source for their Make it Yourself Series in March.

I elected to do quick and simple stamps. This would be so easy and fun for you to do with the kids.

What you will need is;
Craft Foam [I got mine from a discount store]
Acrylic stamping block
Scissors
Craft Knife
Black marker/pen
Cutting Mat
double sided adhesive tape
Glue stick
Ink pad


Begin with drawing your design onto the craft foam

Using either the craft knife and/or scissors cut out your design


Just a close up of cut out stamps and tools used LOL :)


Attache your craft foam stamp to acrylic block with a couple of small pieces of double sided tape [in strategic places :)].


To seal the craft foam stamp top prevent it soaking up too much ink seal it with the glue stick and allow it to dry :)

Ink and stamp away to your hearts content!!! :)


Cheers and happy creating :)

The Color Room/Imaginarium Designs creative background step by step


Hi Guys

This is a layout I created for The Color Room Challenge site when Imaginarium Designs were sponosring the challenges in May :) :) :)

Layout – "a forever memory"

Background and chipboard element paint technique

Materials used;

Imaginarium Designs chipboard background

Imaginarium Designs chipboard hessian square [designed by Louise Nelson]

Gesso – Monte Marte

Paint – Making Memories, Jo Sonja, Kaisercraft

Mist – Crafty Notions

Flower tendril – Prima

Chipboard Alpha – Prima

Vintage Findings word fetti – Making Memories

Gauze


I first glued the chipboard hessian square to the background using a glue stick.
I then mixed some cream paint in with the gesso before applying it to background


Place a few dollops of paint/gesso mix on to the background and chipboard embellishment


Using a coarse foam roller, roll out and cover the layout background and chipboard with the paint/gesso mix.
Don’t over roll the paint/gesso mix otherwise you will loose the lovely coarse bubble effect of the paint and gesso.


Just a close up of the lovely effect you can get using the gesso and a coarse foam roller


I usually use mists, but for this particular colour combination I needed to mix some pink paint with water and put it into a spray bottle to get a colour match.
This was then sprayed liberally over the chipboard embellishment.
I then dried the pink spray paint with a heat gun, after tipping it from side to side, to get it to run and drip across the background board


This is a close-up of the final paint effect on the background and chipboard


Close ups of the layout :)


Cheers and Happy Scrapping :) xxx